Enhancing your marketing efforts to ensure success and bigger ROI is only possible if you have data about the prospect. In fact, the more you know about your prospects the better you can target, engage, and close more deals.
As marketers, it is part of our job to be creative and find new ways to capture more information about our prospects. As such, in this short article, I will tell you how you can capture the conversion page link using Pardot (the B2B marketing automation tool by Salesforce) forms. Let’s do it step by step, shall we?
Step 1 – Create a hidden field
Let’s start by creating a hidden field. This field will be used to capture the conversion page link URL. And fortunately, you can create it in both Pardot Classic and Pardot Lightning.
In Pardot Classic, just navigate to: Admin -> Configure Fields -> Prospect Fields -> Add Custom Field.
In Pardot Lightning, go to Pardot Settings -> Object Field and Configuration -> Prospect Fields -> Add Custom Field.
Now, pay attention to the following. You need to create this field as a Hidden field so that you can add it to your forms without allowing your prospects to see or edit it. When it comes to sync behavior, you can choose whatever option fits better. I usually recommend the behavior to “Use the most recently updated record”, but it depends on the objectives and sync options you have setup with Salesforce. Alternatively, you can also check the option for the field to save multiple values instead of replacing the existing value with the most recent one. Again, it depends on your strategy and objectives.
2. Add the hidden field to your forms
The second step of this process is for you to add the hidden field to all the forms in which you would like to capture the URL of the page where the conversion occurred. You should start by “informing” the field that it is meant to capture a URL as input.
For that, just edit the hidden form field, go to the advanced tab and paste “get-url” in the CSS Class.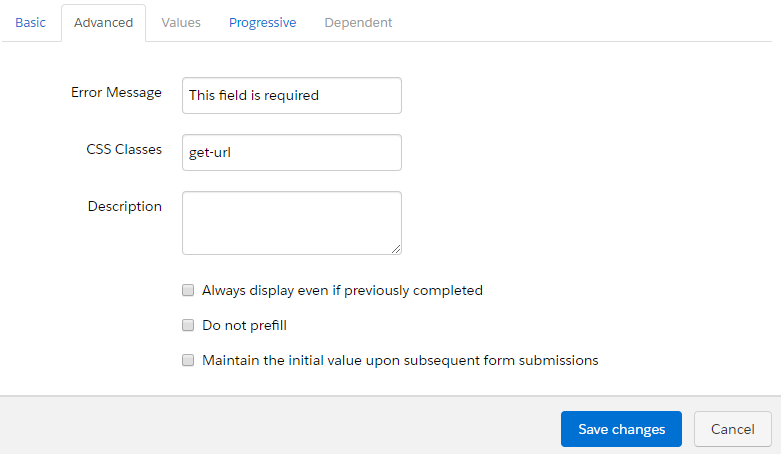 3. Add the javascript code to your form
We’re almost done! The final step, here we go! In Look and Feel, navigate to Below form, click on Source button and paste the following code:
Bonus Step (just for the winners)
