Is the Salesforce Anywhere still a blur for you? We are explaining to you the main differences between Anywhere and Quip, and how to get the most out of this solution. Stick with us to understand how to set up and configure Salesforce Anywhere. Here’s our table of contents for this article:
- What is Salesforce Anywhere and how is it different from Quip?
- Quip Documents
- Salesforce Anywhere
- Generic
- Future Roadmap
1. What is Salesforce Anywhere and how is it different from Quip?
More than answers, we tend to relate to each other by the questions (more like the struggles) we face.
Did you ever come across something like ‘How do I get someone to see the latest update I did to adocument?’ or ‘How do I make it clear on the document the due dates for this, that and the other?’ or perhaps ‘How to embed a dynamic progress canvas within document’ or even found yourself daydreaming on ‘How wonderful would it be to attach a file to a document itself?’
For all of the above, a short answer: Quip.
Furthermore, you might have felt the need to question ‘How hard can it be to incorporate a dynamic document creation in Salesforce?’ or ‘When will it be possible to create a document in Salesforce using the living data with its updates directly reflected in the document?’ or wondered about ‘the greatness of having record context-driven documents in which teams can collaborate in real-time: the end of the version history tracking nightmare!’
Slight longer answer: Salesforce Anywhere.
I get you. For similar questions there are two different answers: Quip and Salesforce Anywhere. So, what’s the difference?
Quip is a stand-alone product that exists in parallel to Salesforce. It does not depend on a Salesforce org connectivity or Salesforce licenses.
Quip users can create templates, documents (we are covering this below) and embed in them dynamic progress canvas, task assignment with the due date (that deliver notifications to the assignees as the due date comes closer), both tag and comment specific portions of the document, add attachments (words, pdfs, ppts, spreadsheet, images, videos, …). All of this with a permanent tracking of what’s edited by whom in the template/document.
Salesforce Anywhere is all of that – and more! Through Salesforce Anywhere, we can build dynamic documents (and templates) for different business use case scenarios: add collaborative meeting notes to your record, create client nurturing plans (Account Management/Opportunity Closure/Campaigns Forecasting, …), Project Management progression with date reminders and embed dynamic canvas boards, or Customer Support checklist root-cause mitigation (Cases), are just a few examples valid for both on standards and custom objects.
If you’re feeling shy, you can find more details on licenses and get more in-depth on the use Anywhere capabilities and how will they enhance your productivity.
Otherwise, feel free to drop your questions in the comments, or reach us for a chat.
Ready or not, get ready! The blur will become crystal clear.
2. Quip Documents
1. Documents vs Templates
A key feature of Quip is that it allows you to choose between blank Documents – tailored entirely by you on what to include and how, and Template documents – where a baseline structure can be defaulted to then be adjusted for record context (each record would have a unique document generated but outlined from a default Template).
Take as example that there are very different and independent teams in your company. And it would be useful that each have their own unique place to collaborate, where they can tailor the information to share with team members – do polls, pull in performance reports, or share ideas. Go ahead and use (blank) Quip Documents as you see fit and most useful to each team.
Now, if you want to implement an Account Plan in your business, to pull specific KPI’s and details consistently across any Account so that you can then discuss and compare in the Sales department weekly meeting, then a Quip Template would best suit your business, because that will ensure the minimum details you need are included in all documents generated out of that template.
To start using Templates, on a new or existing Document, click on the top left ‘Document’ tab, and select ‘Mark as Template’. You now have a Template. Don’t forget to review the content to make sure you convert to template all components you want to.
In a Quip Template you can also lock specific content. You define what you’ll allow users to edit from the default outline.
If you know upfront you want to create a template, we advise you to do it as soon as possible, because it will make a lot of the ‘@’ mention resources available in template mode right away.
There are several use cases for which you use ‘@’ mentions. Below we’ll briefly address the why’s and how-to’s of these.
2. Data Mention
Data Mention is the smoothest way of getting anything added to either the quip template or document.
The ‘@’ Data Mentions available from the Quip Document are common to @ Data Mention on Quip Templates, but usage is broader on the latter.
‘@’ Data Mentions available from the Quip Document for the record – @ Salesforce Data Mention
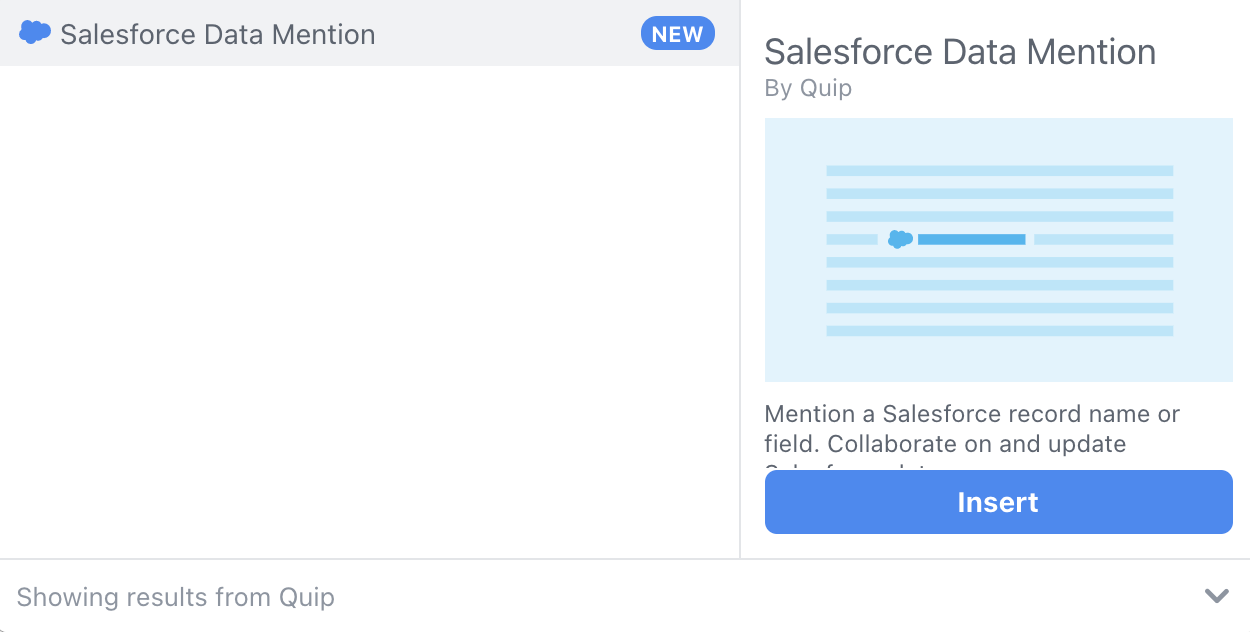
Used to refer a specific Salesforce record field value in a document.
@ Data Mention Quip Template from the Quip Template for a non-record specific reference.
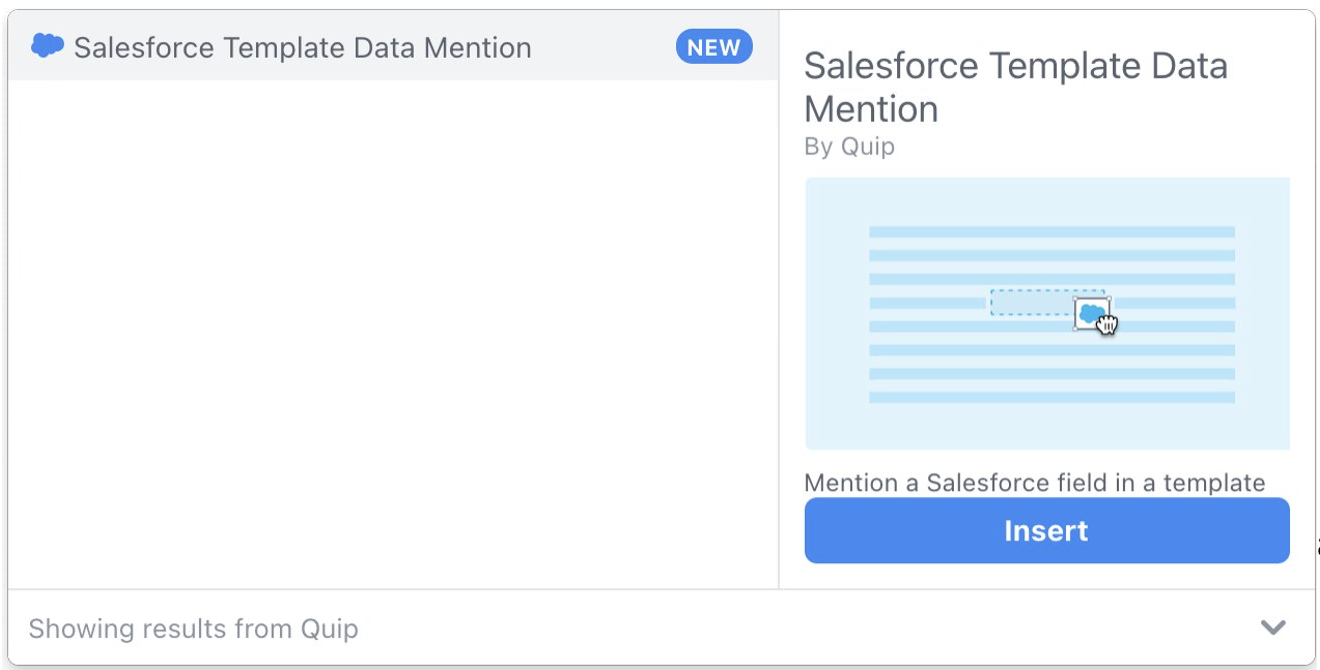
Used to refer a Salesforce context-driven object record field field in a template.
On top of getting always the most up-to-date data from the records – either using templates or documents, ‘@’ Data Mentions allow you, upon granting permissions, to update the record field directly through the document.
3. Record Mention
While Data Mention brings a Salesforce field live into the document, the Record option brings a set of fields of a record at once.
Start by choosing which Object records you want, and type to search for a specific record.
From there, you can then choose to configure which fields from that record to pull into your Document.
If you’re working on a Template document you can choose Template Mode on the drop drown on Salesforce Record options.

‘@’Mentions – Be aware that if your document generates from a specific record using Salesforce Anywhere, there might be some limitations on the fields that will show. You should consider things like field permissions and fields visibility on the layout.
4. List
Do you find List Views useful in Salesforce to narrow records down to what exactly you need to see? Would that be useful to incorporate on a Document to share with your team live data of specific list views?
Quip does that as well! Guess what – Related Lists too!
When adding a Salesforce List to the document, you can choose between a Record List or a Related List.
A Record List will allow you to pretty much see a living List View of an object in the document, if it is already created in Salesforce. Additionally, you can configure how many records you want to see at each time, and which subset of the fields of the original list view to display on the Quip Document.

Related Lists allow us to pull into the Quip Document one of the Related Lists that you have on the Salesforce layout of that record/object.
Once you select the object, you then see the available related lists to choose, and finally, you can choose the columns you want to see on your quip document (this doesn’t affect the same in Salesforce).

You can only select columns from the ones you have available in the Related List on the layout. To have a different set of columns you need to create a new Related List.
5. Reports
When choosing to include a Report in your Document/Template you can choose from the usual folders you have access also in Salesforce.
Once you select the Report you (might) get an option to apply additional filters on top of the data the report will provide.
Here’s where it might become a bit trickier, but we can give you some hints on how to work with Report filters:
- You only get as filters in Quip the ones that are defined on the report in SF itself. So if you haven’t select any in SF, you won’t be able to then filter in Quip.
- Even if you defined a filter in the SF report, when you add the report in Quip you’ll be able to change how to filter – not what to filter, but you can change the filter value differently from SF, e.g. in Salesforce you can have Record Type = ‘empty’, and then in Quip change to Record Type = Customer (without affecting the filter in SF report).
- You cannot add or remove filters in Quip, only to modify the filters defined in SF.
- There’s a checkbox ‘Reapply filters based on the Salesforce record’ under Advanced, which allows dynamic filter to the record ID itself where we are running Quip doc.
Then, you can choose whether to have a report with Live Data (updating dynamically from Salesforce as data changes) or a Spreadsheet with the data at that point in time that you can then edit but will no longer pull updated data from SF.
You can add reports from different Salesforce orgs to the same Quip document. To import a report from a different org, click the org name in the right-hand corner and select the org you want to pull data from.
6. External Resources & other features
Like many other things allow you to attach external resources, Quip also allows you to do that by pulling into your document: Images (Pictures or GIFs), Video (limit of 100MB), or Files.
There are many other resources available for you to organise information you want to share with the team:
Project Tracker, Calendar, Checklist, Spreadsheet, Kanban Board, Polls, Countdown, mention a person/date/document, and the list goes on!
3. Salesforce Anywhere
Now, how about bringing your collaborative document into Salesforce itself, where you can edit the document and collaborate on it with your colleagues all the same as in Quip, but without having to leave Salesforce?
Well, that’s all possible, as long as you have a Lightning page to “host” the quip document.
1. Setup & Config
With Salesforce Anywhere, in a Lightning Record page you’ll have Quip components available amongst the other usual components.
The key component is the ‘Quip Document’ one that will create a quip document, live in to a Lightning page.

There are a few basic things you need to define and configure to make it work.
i) Select the logic of how it generates and associates documents/templates to records:
- Different docs for each record – in each record you’ll generate/have a complete independent/unique document
- Same doc on every record – in every record you’ll generate and have one same document available to be edited
- One template for each record – in each record you’ll generate a different document but with a shared defaulted template as the baseline for all
- Different template for different records – programmatically default a different template for each record
ii) If you have selected one Document or one Template, you’ll need to indicate the URL of the Quip document to be used for all those records.
iii) Whenever your choice implies documents generated for each record, you need to have and associate a dedicated field from an object to store the exact document generated for that specific record.
2. Automations
As much as there is flexibility to the documents and templates either using Quip or Salesforce Anywhere, there will always be need for adjustment regarding the specifics of the business use cases.
Here is the time for automation!
You add a Quip action in both Flows or Process Builders – or even the combination of the two.
Automated processes configuration is set on the Salesforce side of the integration. Note that, it is commonly known that Flow Builder is more and more enhanced, in contrast to Process Builders solutions which retirement is planned.
For any new automation development, consider to use Flows instead of Process Builders. Drop us a message if this got you concerned, we can help!
Depending on the applicability, the template/document usage can be launched as background action (e.g. without explicit user request), or from the user intervention during the document creation process.
As obvious as it might seem, worth mentioning that the structure of the automation must consider what are the intermediate steps/conditions for the expected outcome:
- Pre-conditions to meet for document creation;
- Cascade updates to the record or related records from creating the document;
- Quip folders or members to add to the document once it’s created;
- User friendly sequence of screens with both clean look and feel from what is really needed as input, and clear error/warning messages from what is blocking flow completion;
There is a sub-set of Quip specific flow actions:
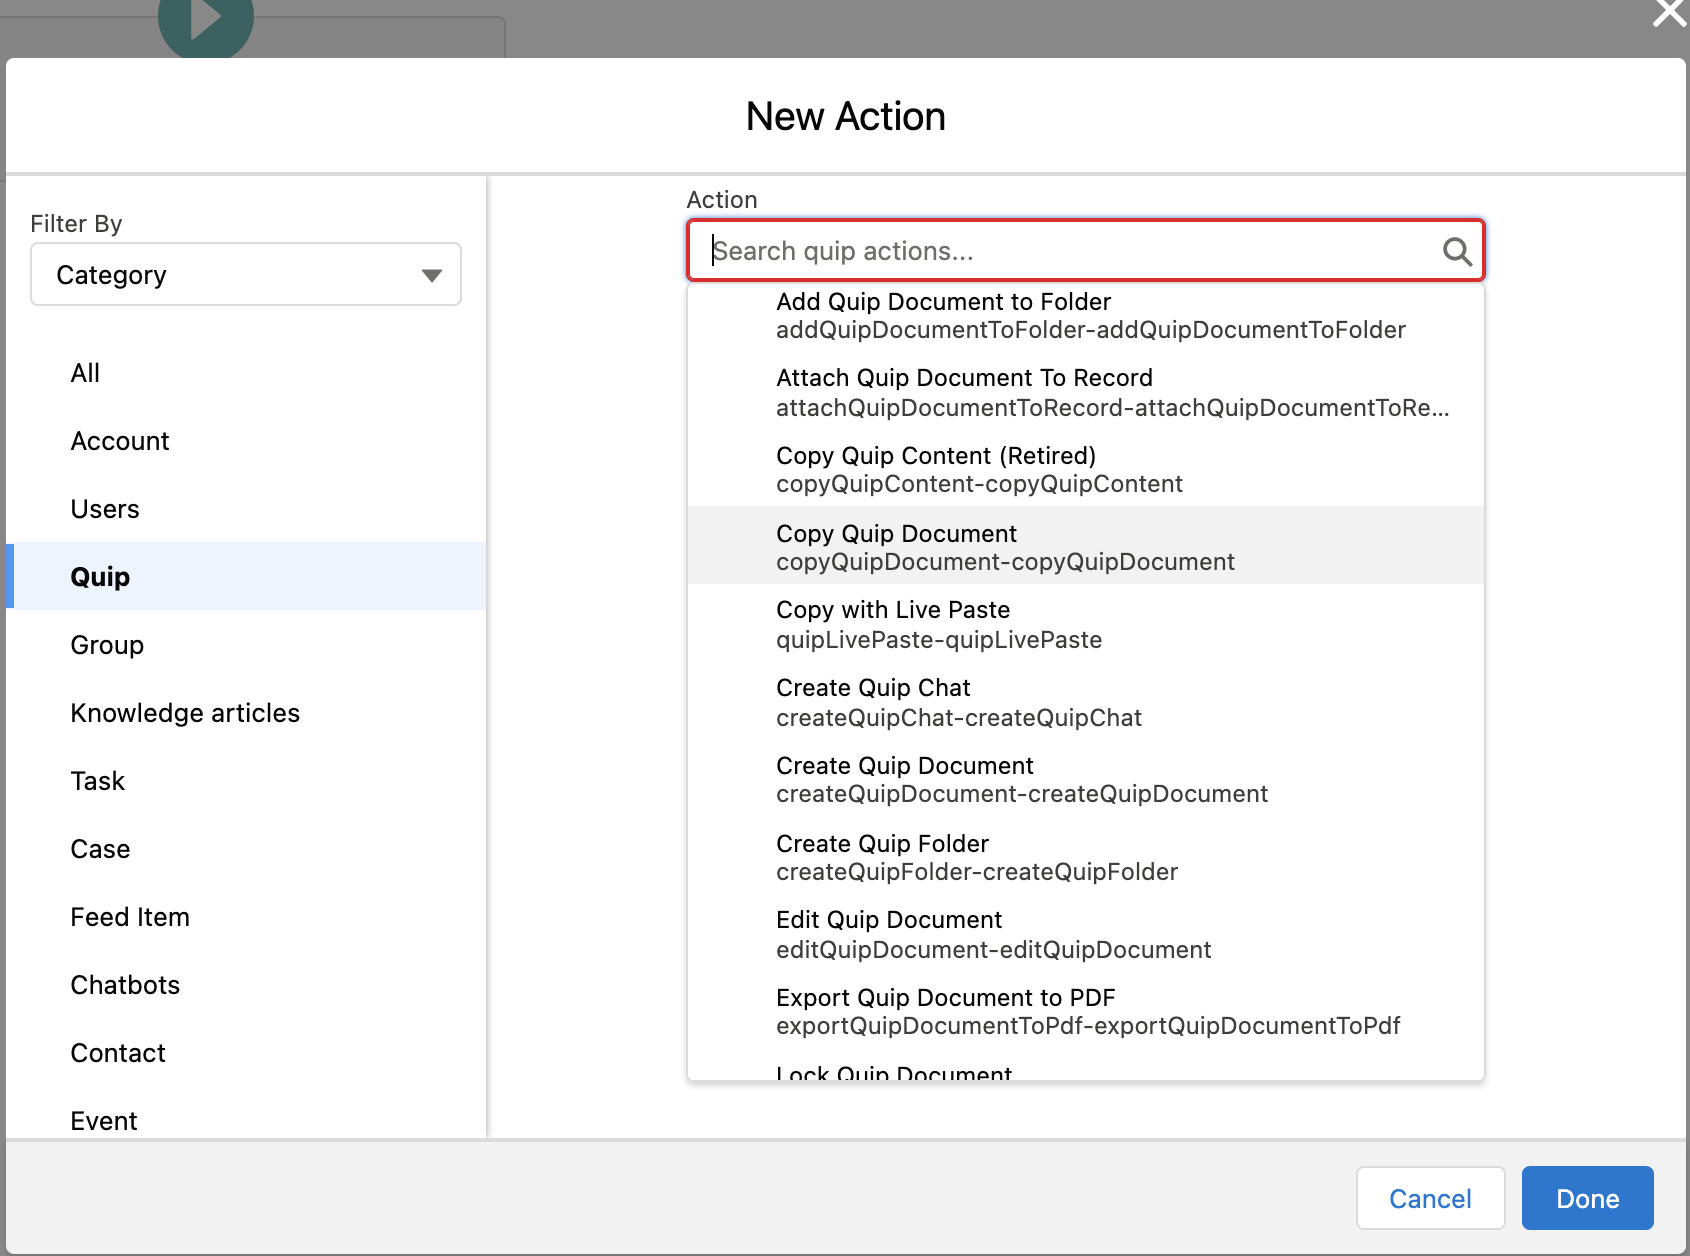
For further reading on the capabilities on the available actions here.
To create the quip document, or using a template, the automation input parameters must follow the structure of the action which is expected to be performed in quip (e.g. a quip action to create a document from a record requires a template as an input parameter; whereas a quip action to add a document to a quip folder requires both the quip folder and the document to the quip)
As the feedback from companies goes in, it adjusts the available actions. This might require you to keep up to date with the quip releases ensuring flows continue ‘live-ing’ healthy.
On a more technical note, not essential but potentially handy – specially in bigger dimensions instances – create different documents/templates for the live org and the different sandboxes. With this structure, it ensures templates and documents use the appropriate records references and data content.
Some examples to help you starting on the automations setup can be found in the Quip training materials.
4. Generic
1. Members provisioning & Authentication
Provisioning members access to Quip is different from enabling users’ access to the Quip.
Members provisioning consists in add members to the Quip site – this doesn’t consume licenses, only ‘authorises’ users to join the Quip site of the company.
You can add member manually, or by bulk file import:
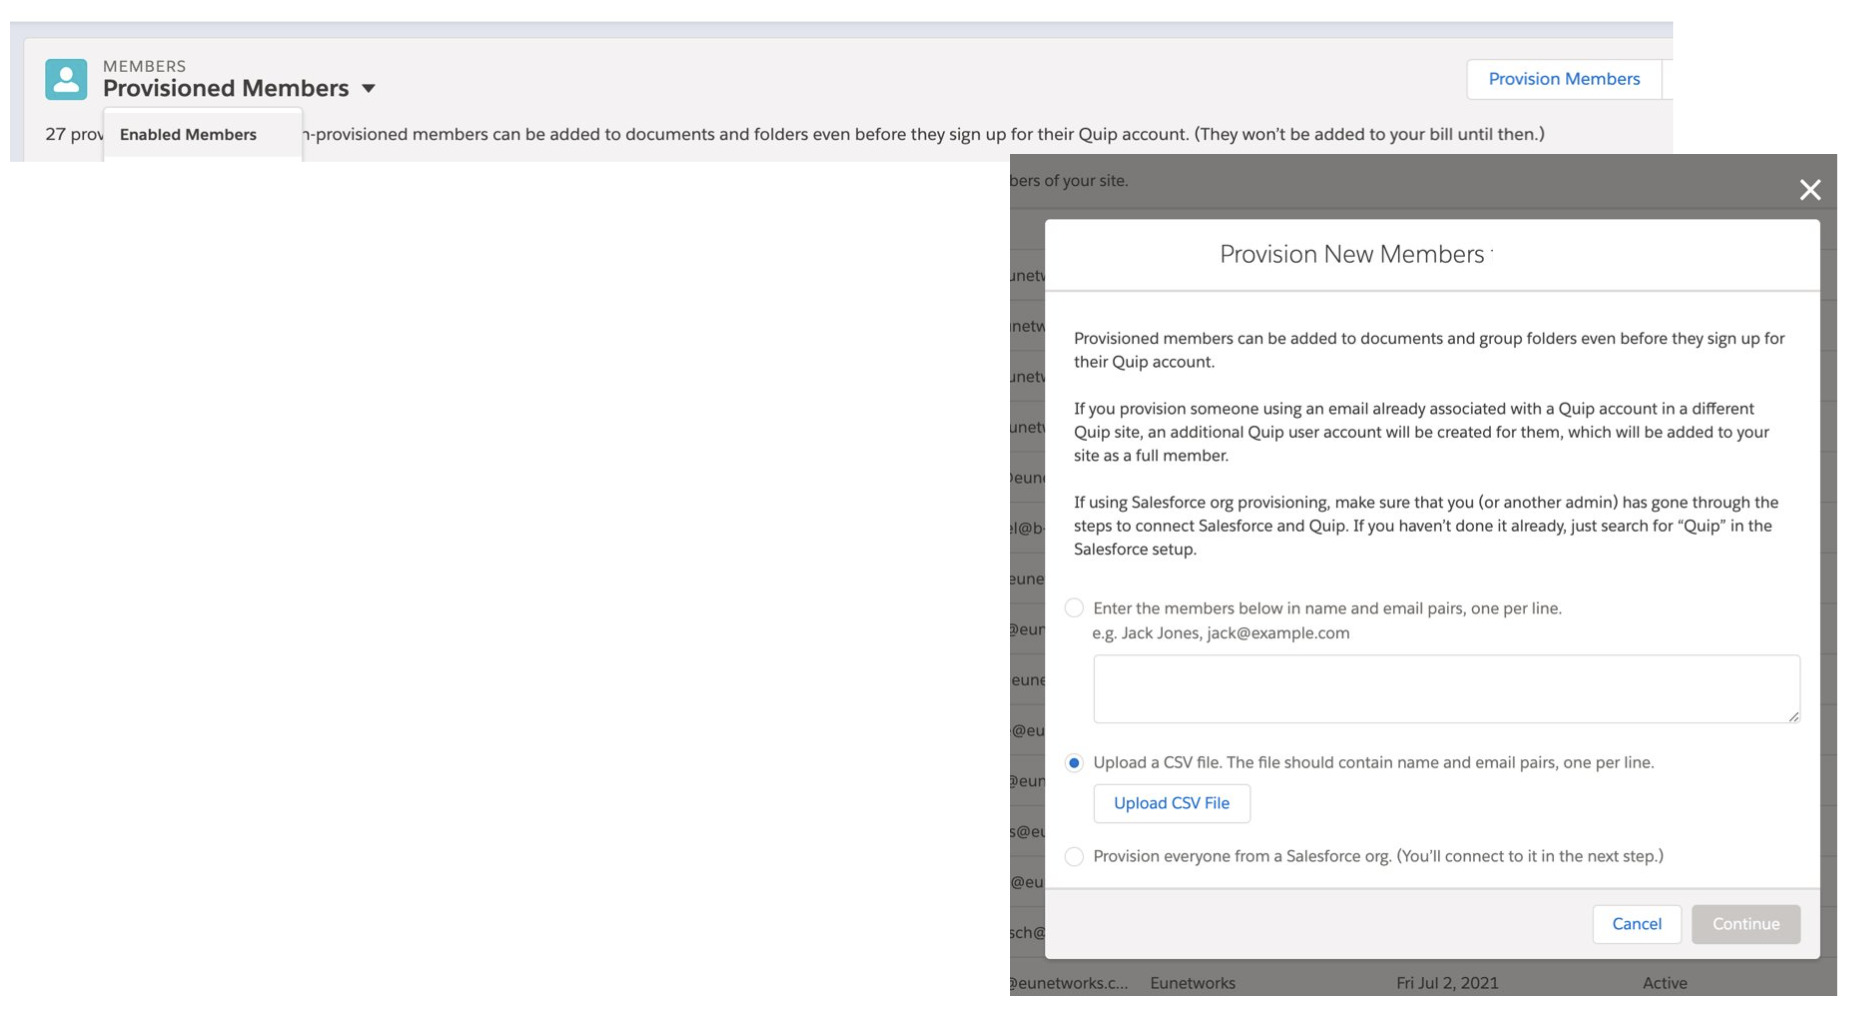
Users must confirm access to the Quip site on their end. You do this either by signing up in the Quip or by confirming access directly in the Salesforce instance:

The Quip member while provisioned is displayed with Status ‘Provisioned’. Once you sign up, the member Status updates to ‘Active’ – it only consumes a license when Quip it’s ‘Active’.
2. Permissions (OWD)
In order to fully enable Quip to a user, you need a permission set.
Depending on the organisation structure, it can be done at as user assignment, or profile assignment.
Keep in mind that the Salesforce permission enables the level of access defined on the Quip site for the records, templates, and documents management.
3. Sharing & Export
At this point it should be clear that Quip has a collaborative structure. It don’t exactly reproduces the so far used to office formats documents.
In this extent, the sharing happens through links.
Do not faint just yet!
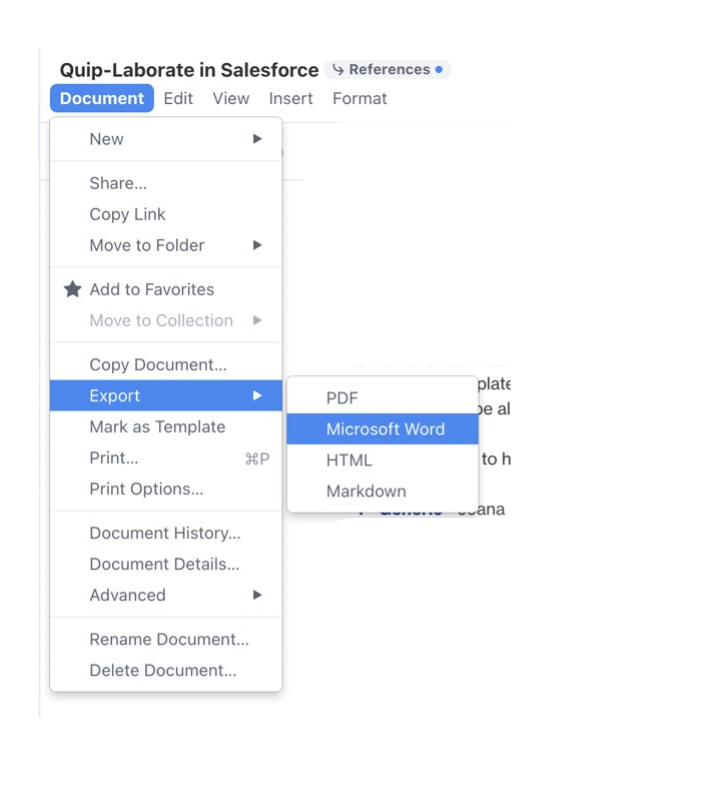
Quip documents/templates can be exported in the typically known/used formats:
Plus, as all the freshly launched products, there is close monitoring from the Quip account managers to the customers using Quip in which concerns the overall customer experience and features requests.
Some of the items often reported being important to enable are: pagination, page breaks, headers, footers and broader text formatting options.
5. Future Roadmap
With Salesforce we have a planned and steady release calendar, as well as a planned roadmap available.
Quip, on the other hand has a more fluid calendar. In short, there are no predefined dates, or time period to deliver releases.
Typically there are monthly releases, lately, there have been every two weeks, or weekly releases. With both bug fixes, improvements and features requests. Read the Quip Release Notes for more information.
One thing is for sure, it will continue to evolve as any other Salesforce product does. An example of that is the recent new option to integrate Quip with Slack. It makes it even more powerful and collaborative.
We hope you enjoyed reading it as much as we enjoyed sharing our experience with Quip!
SUBSCRIBE KNOWLEDGE CENTER
Subscribe for free to our Knowledge Center to get the latest articles straight to your inbox!

